Showing posts with label Nursery Decorating. Show all posts

Wednesday, May 21, 2014

Let's Get Personal...With Art

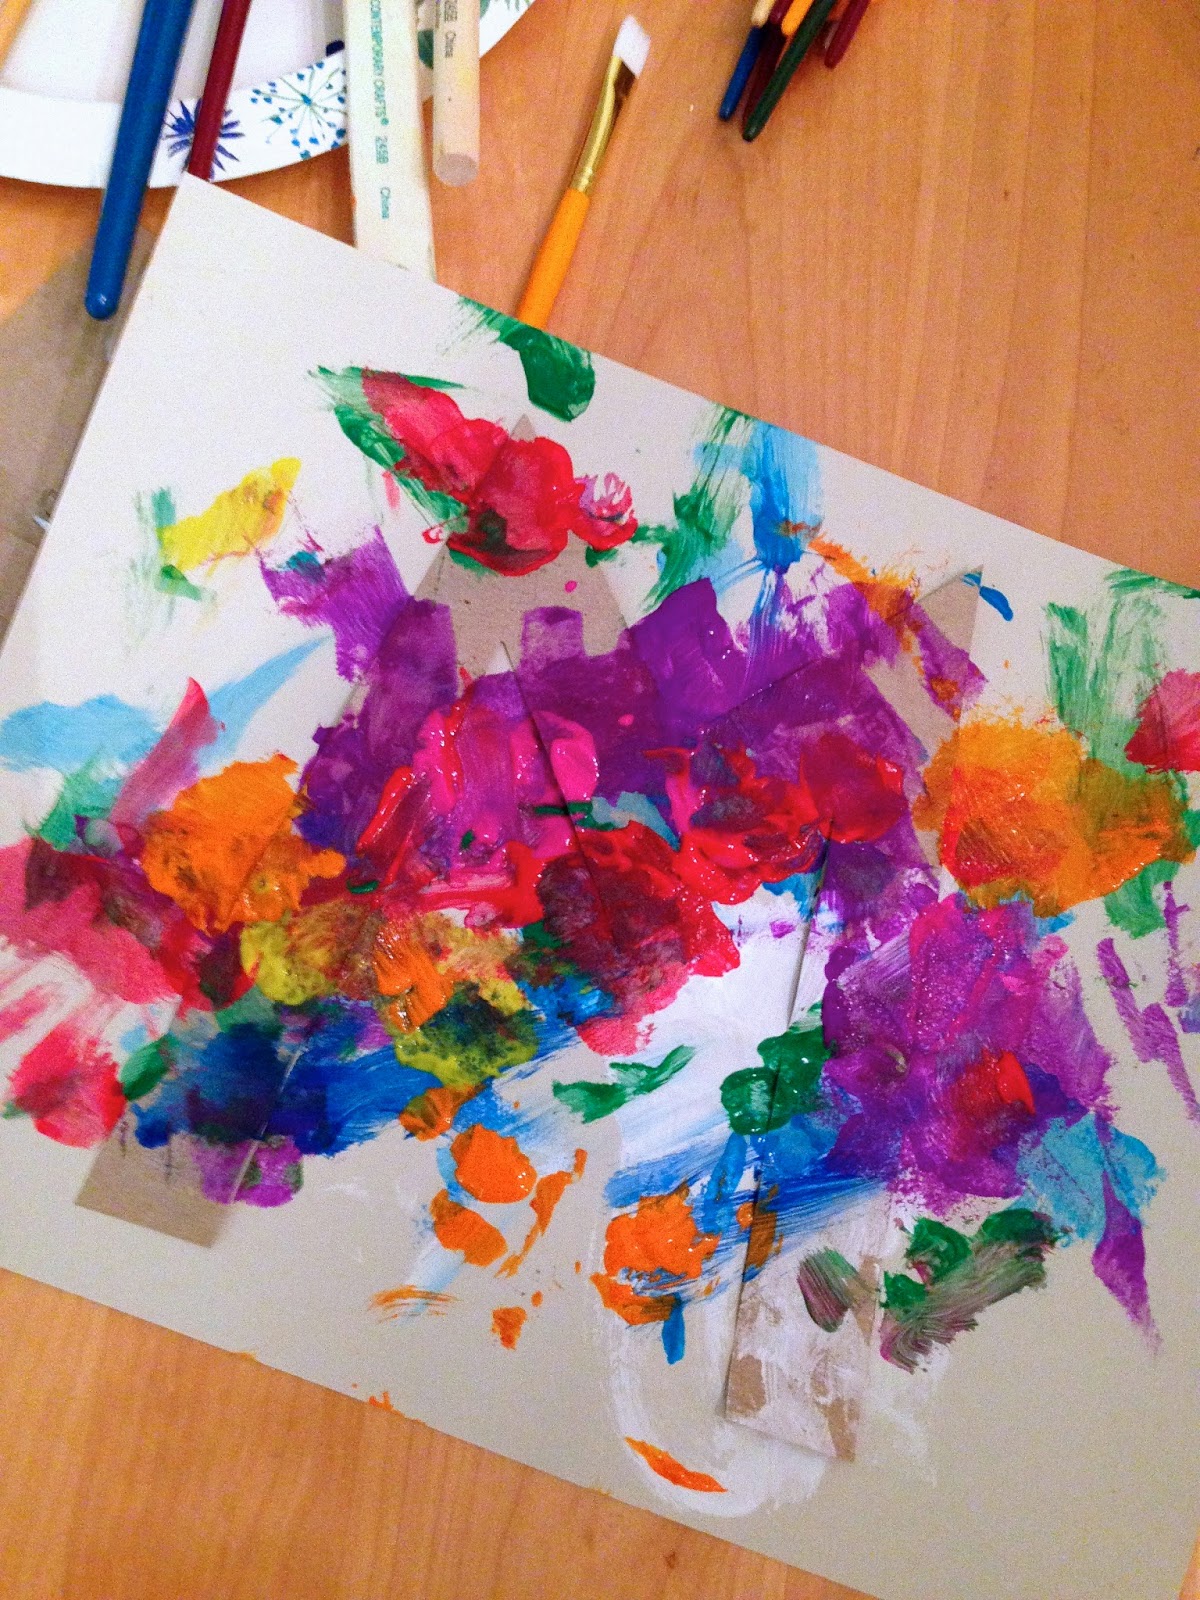
Taking it down a notch (or ten) from this Monday, I'm back to crafting. It's not another quilt...it will be a while before I can tackle one of those again. It's some personalized nursery art. Of course it involves the artistry of your little one, making it doubly personalized (and doubly awesome). 

Again, I should apologize for the iPhone photos, though I think in this particular post it's only enhancing the free-flowing, impressionist style of my daughter's work.


The execution was pretty simple. First, I cut a letter "M" out of some scrap paper. Next, I taped the M to a piece of card stock using little circles of scotch tape. I chose card stock instead of regular weight paper because my daughter tends to paint with thick layers and regular weight paper has a hard time handling her magic. She's great at blobbing and blotching. 


Then I let her do her thing. Typically brown and purple are her favorite colors to work with, but for this particular project she went full rainbow. It's hard to see the M in the painting below, but it's there.


I let it all dry, then I gently peeled off the M. Ta Da! A sweet, frame-worthy creation. I absolutely love it.


I love painting and I think my little lady is taking to it as well. Speaking of those who love painting -  did anyone else read Taylor Kinney's interview in which he talks about how he and Lady Gaga love painting together. I bet some freaky stuff goes down in those creative sessions.

Tuesday, April 29, 2014

The Best of The Land of Nod

When I online shop, I'm a big proponent of checking out the "best seller" section of the website. I like knowing what others find to be tried and true products. I also love when you can sort products by customer ratings. Of course, nothing beats a personal recommendation, but I'm happy to have the readily available opinion of world wide web users.

The bad news is that the algorithm used to rank "best seller" products is often a sham. Why? Because there's rarely consideration as to the number of reviews. For example, Product A has one 5 star review and product B has twenty reviews that average to 4.8 stars. Most websites will rank Product A higher on the best seller list than Product B strictly based on the average number of stars. That's kind of bogus, right? I'd rather buy something that 20 people raved about than something 1 person thought was perfect. Unfortunately, some of my favorite baby product vendors are guilty of this poorly configured ranking system. With this in mind, I give you today's post - my very own "best seller" list for The Land of Nod. My hope is to tackle a bunch of online stores over the next few weeks and find us the TRUE best products from each site.

The Land of Nod reviews are based on a 1 to 5 star system, with 5 stars being the highest. My best seller list will include only those products who've received an average rating of 4.5 stars or higher from at least 50 reviews. And, in case you were wondering, I'm not an affiliate of The Land of Nod and I get absolutely no kick back for today's post. Let's get on with it.


Number of Reviews: 67
Average Rating: 5 stars

This crib is made of maple wood and comes in natural (above), espresso and white. For the past 6 years, people have been absolutely raving about it with review titles that include "WE LOVE THIS CRIB" and "Thrilled with everything related to this purchase!"


Number of Reviews: 113
Average Rating: 4.9

It comes in white and chocolate, it has those nice side handles and the lid is designed to hold its position at any height/angle so it never slams down on tiny fingers. 


Number of Reviews: 80
Average Rating: 4.7

This is a hand-tufted 100% wool rug with a cotton backing. Can't you just see your little guy (or girl) racing cars along those tufted raceways?


Number of Reviews: 77
Average Rating: 4.8

This adorable indoor teepee comes in four patterns: floral (above), gray and white dot, black stripe and orange stripe. The floral pattern was just added to the mix. Reviewers said that setting it up was "a breeze" and that all the kiddos think it's completely awesome. 


Number of Reviews: 185
Average Rating: 4.9

This beautiful twin bed might be the best rated product on the list. It's also ridiculously adorable if ever a bed were adorable. It comes in all sorts of colors (raspberry as seen above, yellow, azure, black and white) and all sorts of sizes (twin, full and queen). AND you can purchase a trundle for sleepovers.


Number of Reviews: 74
Average Rating: 4.8

This simple, classic lamp will work in every nursery because it comes in 11 colors. 11. The diffuser creates a mellow, cozy vibe that many (many) reviewers call "perfect".


Number of Reviews: 76
Average Rating: 5

It's a 4" shelf and comes in 2 sizes (5 pegs as shown above or 3 pegs). People love both sizes and everything think it's sturdy and good lookin' and very functional.

So, there you have it, a list of truly great products from The Land of Nod. I see the Hangin' Around lamp in my daughter's bedroom's future...


Friday, April 25, 2014

The Garland is Done, Man

It's all done. And I think it's puuurty.


So, before I give you the details, let me first apologize for the pitiful photos. They were taken with my phone on a rainy day (there was minimal natural light...and I hate taking flash photos).

Here's how part two of the garland project went down (click here for part one). First, I decided how long I wanted the garland to be. This was dictated by the number of hearts that I had made (16) and how far apart they would be on the twine (6-8 inches). I pulled the twine to the right length according to my estimation (this wasn't a precise process), but before I made my cut I decided that a single strand of twine wasn't going to work. The twine, as is, didn't seem substantial enough to do the job. My plan became to braid three strands together. With this in mind, I cut three pieces of twine substantially longer than I had calculated because I wasn't sure how much length I would lose in the braiding process.

I knotted the three strands together and used a binder clip to attach the knotted end to a chair. I intended to stand up, pull each strand taut and braid. It didn't really work because the strands were crazy long. I ended up winding each strand in circle and securing it with it's own binder clip, making each strand shorter and easier to work with. When the base of my braid hit the binder clip I would unwind some of the twine and re-clip. Am I boring you yet? Just know that this part was unexpectedly difficult and took a while.

Here's the end of my knotted twin clipped to a spindle on a chair.

Here is the finished braid.
It's a pretty lose, which was intentional.
You could certainly make a tighter, more defined braid.

Once the twine was successfully braided, I began to attach each heart. I used red thread and sewed by hand.


Above shows the twine attached to a pink heart. I chose a back side of each heart and sewed the twine on that side rather than on top (where the heart indents). I experimented with sewing it on top and I didn't like seeing the thread on the front. But, I'm a total amateur at this sewing bit so a more seasoned pro may choose otherwise because they can stitch more neatly than I.


That's what it looks like from the front - you can't see how the twine attaches. I didn't use a ruler to make sure each heart was exactly the same distance apart, I just kind of eye balled it. The imperfections add to the charm.

After about an hour of work, bringing the total project length to three hours, it was ready to be hung. Truth be told, I hung it up for your benefit and took it down shortly after taking the photos, so don't be freaked out by the fact that it looks like my daughter could reach out, grab the twine and seriously injure herself or her teddy bear. My current digs are temporary, hence the extremely sparse decor. I will give you an update post when this beautiful creation finds a permanent home in my soon-to-be permanent home.


Thanks to the low quality photographer photograph, you can't see the color gradation between the hearts, but it does exist. There are four colors in total - pale pink, coral, bright pink, red.


And that's that. 

Any crafting projects planned for your near future? I'm in the middle of a quilt - that's right a quilt. It's my first and I'd love a few insider tips if you have any. Have a great weekend.


Friday, April 18, 2014

DIY Felt Heart Garland

As promised in this year's Blogiversary (aka blogging anniversary), I'm crafting again. Wait! Before you immediately click out of this post because my last crafting attempt was so painfully weak that you can't stomach the thought of suffering through a similar embarrassment, please give me another chance and keep reading. Everyone deserves a second chance. Novice crafters included.

A while back, I was inspired by an image of felt hearts that I came across on Pinterest. I'd love to share this image with you, but I believe it's against blogging rules (here is the link if you're interested). My idea was to make the felt hearts and string them together in a garland or, if you're British, bunting. I wanted to tweak the hearts a bit...well...I'll just show you because months after finding this inspiration, I actually did it.


There she is, my first felt heart. Not too bad. But, let's back up.

I got all my supplies at Joann Fabric because there's a store really close to where I live. These supplies are super basic and you can get that at any craft store or Amazon.com or even Target. The supplies include 8 sheets of 9" x 12" felt, polyester fill (that gauzy material inside stuffed animals) and a roll of twine. For the felt, I chose four colors (pale pink, coral, bright pink, red) and got two sheets of each color. I own a sewing machine (this one) and white thread.

My first step was to cut all the felt in half and then half again.

Above is my pile of felt and to
the right is a sheet of the pale
pink cut into four pieces.


Next, I made a heart template because I wanted my hearts to be roughly the same size. I didn't have any cardboard laying around, so I used a Carter's mailer. It was card stock, not quite as thick as cardboard, but worked just fine.


Starting from left to right (above): I used the piece of felt to cut a rectangle in the mailer, then I cut a heart (free hand) out of the rectangle. 

Next came the task of using my heart template to cut all the quartered, rectangular pieces of felt into hearts. It took a while to cut all 32 hearts (8 sheets, each cut into 4 rectangles). I got lazy halfway through and cut two hearts at a time. I now know that I could have been even lazier because having a perfectly shaped heart from the start isn't necessary (more on this later).

The plan was to pair off the hearts, sew the twosomes together and somehow stuff them with fill in the process. But I was a bit stumped when it came to the stuffing part - I didn't know how. My first thought was to layer the felt with fill, pin the whole thing together and then sew. Within seconds, that idea fell to the wayside because it seemed too difficult and too time-consuming.


Above is the layered heart and fill. Not a great plan. My next idea was to begin sewing the two felt hearts together, leave a small gap before finishing, stuff the heart while it was still on the sewing machine, then finish out the sewing. Below is a photo of this method...I admit that it's not a masterful idea, but I'm neither a masterful craftsperson nor a masterful seamstress...so it was fine by me. And, most importantly, it worked.


I would just push the fill into the small whole at the bottom until the heart was full and then finish sewing.


Above is an action shot for ya. Don't worry the sewing machine was off...I think. There were definitely bumps along the way. I'm still not great with my sewing machine (see below), but overall they came out pretty well.


I chose a zig-zaggy stitch setting on my sewing machine (#3 if you have the same machine) for a little flare. Also, after I completed each heart, I trimmed the outer edge to even out the shape - hence why it didn't matter whether the heart was perfectly shaped from the get go.


Above is my final batch - all 16. The low-tech photo taken by my iPhone doesn't show the range of color (at all), but in person it's a true spectrum of pale pink to fire engine red. The first 8 hearts took me a little over an hour to make and the second 8 hearts took me about half that time. In total, it was a two hour project. 

My next step is to use the twine and string them into a garland. If you've been relatively more impressed by today's crafting show - thank you and stay tuned for a post next week on the finished product. If you are, again, saddened by my attempt, you have my full permission not to read the follow-up post. My apologies.

What crafting projects have you embarked on lately? Ever followed through on a DIY project inspired by Pinterest? Oh, and what DIY/Crafting blogs do you read (and love)?


Friday, April 11, 2014

Rainbow Toddler Bedroom

A while back I made a moodboard for a rainbow nursery. Thanks to Pinterest, I learned that people dig rainbow nurseries. Between the general population's interest and my current bedroom decorating project, I decided to update the rainbow theme from a nursery to a kid's bedroom. Below are some of the many beautiful items of inspiration that I found.

(image sources - below)


Where To Find Everything Above

Garima Dhawan Duvet Cover from Wayfair
Rainbow Raindrops Post Decal from The Land of Nod
All in One Music Toy from Pottery Barn Kids
Personalized Kid's Rainbow Bunting by Made By Eden Grace
Ferris Wheel Pillow by Janelle Tweed

Friday, March 28, 2014

Sherbert Inspired Nursery

It's Friday, which seems to be moodboard day. Today I was inspired by the Sherbert crib bedding from The Land of Nod. It's a simple stripe pattern, but the range of color presents so many decorating options. You got pinky/coral, light gray, turquoise, muted lime and a touch of lavender. I focused on the pinky/coral, turquoise and lime, but there are so many delightful combinations. Or, you could just go buck wild and decorate with all five.


image sources below


Where to Get These Sweet Finds
Sherbert Striped Crib Bedding from Land of Nod
Baby Owl Clock by LeLuni
Today is Great Pillow from Serena & Lily
Senegalese Storage Basket from Serena & Lily
Turquoise Heart Art by Of Carola

Friday, March 21, 2014

Foxy Little Bedroom

I'm still of the mind that hedgehogs are on the brink of baby decor hotness. But, for the moment, foxes are the ruling trend. Here are some unique finds to decorate your baby girl or boy's bedroom.

(image sources below)


Where to Find These Whimsical Treats

Storage Bin from Giggle
Faux Fox Taxidermy by Kelsey Davis Designs
Knit Rattle from Land of Nod
Printable Art by Two Moons and a Fry
What Does a Fox Say Crib Sheet by Babiease


And, just because:


Monday, February 24, 2014

Happy Hedgehog Nursery

I've shown you elephants (here), I've shown you giraffes (here) and today I'm showing you hedgehogs.  Maybe I'm feeling nostalgic about never getting a high score on Sonic the Hedgehog, maybe I just loved the Land of Nod bedding below.  Either way, here is an orange, gray and woodsy collection of hedgehog items for a gender neutral nursery.

Image Sources - see below

Details on these cool products:

Throw pillow by Laura Frisk
Hoop Art by Box Room Bazaar
Bright Eyed, Bushy Tailed Bedding from Land of Nod
Tree trunk lamp from Svpply

Wednesday, February 5, 2014

Round Two: Surprise...or Not

When you were pregnant with your first, you have a sort of clean canvas upon which to decide whether you would find out the baby's gender.  Or not.  You consider a bunch of things, but mostly you go with your gut (i.e. I NEED TO KNOW...or surprises are the best).  Now, you're pregnant with bambino numero dos and you're once again faced with the decision to find out the baby's gender or not.

This time around, the canvas ain't blank.  In fact, this time around, the canvas is completely splattered and smudged and smeared with the loving art of your firstborn.  So, the considerations you had when making the determination with your first are probably going to be different than this time around.

For starters, whether you decided to find out the gender of your firstborn or not, you now know that he is a he or she is a she.  So, you now have gender specific things all over your house - clothes, shoes, toys, bedding, gear and countless other miscellaneous baby accoutrement.  Whether you wanted to or not, you've been gifted and otherwise accumulated lots and lots of girly or boy-ey (?) stuff.  If baby number two is the opposite gender, you may find yourself needing to (or wanting to) purchase some stuff that suits his or her gender.


They (tropical5 on Etsy) makes pacifiers that are blinged out with Swarovski gems.
You may want to go with something less...pink and sparkly for your baby boy.  Maybe.

There's also the fact that baby number one is around for this pregnancy.  Baby number one is following along, on some level, and may benefit from knowing baby number two's gender.  You may benefit from using baby number two's gender in your readying of baby number one for this major life transition.  Or,

And, what about the logistics involved with where baby number two will set up shop for the long run?  If you're going to have two kiddos of the same gender, it might be in your plan for them to share a bedroom.  Two kiddos of opposite gender may influence you to give everyone their own space.  This sort of decision is nice to make in advance because it gives everyone some time to emotionally adjustment and it gives you time to physically get the space ready.  


Perhaps the lavender decor is too girly for your baby boy?  
Perhaps the airplane decor is too boy-ey for your baby girl?


I didn't find out the gender of my firstborn.  I was miserable about it for the first trimester and most of the second...just desperate to know what my husband and I had decided not to know.  About halfway through my second trimester the desperation simmered.  By my third trimester I was pretty excited that we had kept it a surprise.  On the day that my daughter arrived, I was already sure that we would keep baby number two's gender a surprise as well.  I wonder if my mind will change when the time comes...


Wednesday, January 29, 2014

Something Lighter, Something Pink and Red and White

Posts have been heavyish lately with meaty discussions and money debates.  So, today I'm going with something lighter and fully off topic: I've been thinking about my daughter's bedroom.  As you may remember, I lived (yes...lived, past tense) in a small NYC apartment.  For the first four months of my daughter's life, we all slept in the one and only bedroom.  My husband and I had our bed and she had her crib.  We skipped the co-sleeper/bassinet phase because there was no space and no point - the crib was about two feet from the bed.  It was a small apartment with a small bedroom.

When my daughter was about four months, my husband and I moved to the living room.  We slept on our sweet Ikea pullout couch for the remainder of her first year...and some.  For a while there, our living room was our bedroom was also her playroom was sometimes our dining room.  It got really complicated.


This is Ikea's Manstad and the pullout couch that I speak of, same color and everything.
I don't think they sell it anymore in case you were wondering.  


During the past couple months, our family of three has made some big changes.  For starters, my husband and I no longer sleep on the couch.  That's because we no longer live in that tiny, awesome NYC apartment.  In fact, we no longer live in New York.  We recently headed north to the Boston area and can now officially call ourselves Massholes.  We're thrilled.

With our new geographic location has come more space.  Much more space.  For starters my daughter has her own room.  Or, should I say, my husband and I have our own room.  And so, I've been thinking about what most women consider when they're still pregnant - the nursery.  Although, I don't think it's technically a nursery because I no longer have an infant.  So, I suppose, I've been thinking about a toddler bedroom.  Not so much mobiles and Boppy pillows, but mini chairs and chalkboards.

My vision is red, pink, white and birch.  Something like this...


I made this little mood board using the website Olioboard (super fast, super easy, super free) and here are the links to all the above products:

1) Red kid's adirondack chair by Loll Designs 
2) "To the Moon and Back" pink pillow from One Kings Lane
3) Red three legged lamp from Lamps Plus
4) Wooden rocking horse from Land of Nod
5) Nightstand by Posh Tots
6) Tea set by Plan Toys
7) Poodle Pouf from CB2
8) Pink cotton rug from Dash & Albert 

I paid zero attention to cost when I made my mood board and, unfortunately, basically all items are beyond my budget.  Other than that adorable wooden tea set, which is $25 (a likely 2014 birthday or holiday gift for my daughter).  Cost aside, you can get the feel for what I've been thinking about.  I hope to turn my vision into reality with more budget friendly items.  Maybe I'll even share as the process gets underway...a la Young House Love (my favorite blog).

How did you go about decorating your baby's nursery?  Or your toddler's bedroom?  Where did you shop for furniture and accessories?  What was your inspiration?

Wednesday, January 9, 2013

My Crib Choice

I'm back and I'm sharing my crib choice.  It was one of my first big decisions when I found out that I was pregnant.  With that being said, it took me quite a while to pull the trigger because I had a pretty long list of musts-haves and would-likes.  Overall, I was aiming for high quality versus high style.  This wasn't an area that I was willing to compromise if at all possible.  My baby-to-be was going to spend a lot time in the crib (hopefully 8+ hour stretches...) and I wanted it to last through moves to new homes, into toddler years and even for future family members.

Here's my list:

  • Relatively small - You know by now that I live in an small, one bedroom, NYC apartment.  The crib was going to (and now is) sharing the minimal square footage of the one bedroom.  I didn't want a true mini crib because I intended to use it in the future, in bigger spaces and with younger siblings.  Rather, I wanted a standard size crib that would fit a standard size mattress, but otherwise small (minimal thickness and height).  Some cribs are pretty bulky.  I wanted to steer clear of those cribs, however gorgeous they might be.
  • Made of wood - Wood is better than pressed board (aka MDF) for a couple reasons.  First, it lasts longer.  Second, it's natural.  Pressed board contains some gnarly chemicals and while I wasn't going to be obsessive about off-gassing concerns (Google it), choosing a wood crib versus a non-wood crib seemed easy enough.
  • Non-toxic finish - There are so many cribs with non-toxic finishes nowadays that it was simple to go with the safer option.
  • Light finish - This was purely aesthetic, but I preferred a light finish (white, birch, etc.) versus a dark finish (cherry, expresso, etc.).  I work with the theory that light and bright colors help open up small spaces.
  • Simple style - I'm not into ornate things, cribs included. 
  • No drawers on bottom - At first I absolutely, positively wanted drawers on the bottom of the crib.  I figured the added storage was what every one bedroom apartment with a newborn needs.  But I changed my mind.  I realized that an open bottom crib gave me options.  I could use the open space for more versatile storage like baskets or plastic bins.  Or, I could just leave it open for storing playmats and other randomly shaped baby stuff.  
  • Convertible into a toddler bed - Stretching the usability of the crib just made sense to me, especially because I wanted to purchase a high quality crib that I believed would last into (and beyond) toddler years.   


And now my choice - the Robin crib by Oeuf


What you see above is what you see in my bedroom, with the exception of the toddler doing yoga and the funky shaped cow rug.  So far, so good.  I'm very pleased with my choice.  It met ALL of my must-haves and even my would-likes.  I didn't have to compromise on a single thing.  The price point seemed mid range ($499 without the toddler bed conversion kit) compared to other models I was considering.  I had looked at everything from cribs available on Walmart.com to the Stokke Sleepi crib.  I really liked a crib by Argington (here), but was ultimately dissuaded after reading a number of reviews about faulty legs that snapped and broke.  The Robin crib was the right crib for the right price and I happened to love the way it looked, bonus.  

How did you choose a crib?  What did you ultimately settle on?


Tuesday, September 18, 2012

Lavender, Violet, Eggplant Nursery

After all that gender neutral talk last week, it's time to head back to the world of girly girl and boyee boy.  Never said or written boyee boy before.

Today's mood board features all different shades of purple to create a perfectly feminine nursery.  Just like I have been inspired to write about gender neutral baby stuff, I've also been inspired to pull together  a pretty purple nursery palette (say that 3 times fast).  More and more of my friends, who know they're having girls, are opting for purple nursery decor over pink.


(Clockwise from top left)
Lilac/grape cabin quilt euro sham from Serena & Lily ($68)
Medallion rug from Pottery Barn Kids ($399-$699)
Marcella tote from Z Gallerie ($59.95)
Pearhead wooden elephant bank from Diapers.com ($25.29)
Bizarre crib bedding from Land of Nod ($29-$89)
Art print from Once Upon a Paper ($20)


Tuesday, August 14, 2012

Baby Boy's Airplane Nursery

Guess who learned some tricks on Inkscape?!!

You probably don't know what/who/where about Inkscape.  It's a free version of Photoshop...which is design software for your computer.  Now that you know what Inkscape is, you probably don't care who learned some tricks on it, even though you've already guessed that the someone is me.

So how, if at all, do my new found talents on Inkscape affect you?  I'll be able to deliver you some better looking mood boards because I can now cut around the edge of objects.  Woohoo.

And we're off with a baby boy's airplane nursery.  Blue and gray/silver seem to be the best colors to work around.  Though I imagine any pop of something else could be easily added to that mix: red (like below), yellow, green, orange, etc.


Come Fly With Me crib bedding by Land of Nod ($29 - $172)
Airplane Pillow by Little Korboose ($25)
Airplane nightlight by Pottery Barn Kids ($39)
Little Paper Planes craft book from Uncommongoods.com ($20)
Iron airplane sculpture from Pier 1 Imports ($39.99)
Airplane wall decal by Graphic Spaces ($50)

Tuesday, July 10, 2012

Turquoise Nursery

Turquoise is the new yellow.  Or, technically, turquoise is the new orange...because orange was already the new yellow.  I'm talking about colors that can be used to decorate a gender neutral baby nursery.  Turquoise is great for a girl and great for a boy.  It's unisexually (huh) great.  

Check out the bare bones turquoise nursery (below) by Lulu Kuku, an Etsy shop that sells the cool world map wall decal (currently on sale for $44.20).  I can definitely picture a little lady or gentleman in that crib.


A friend pointed out this color trend to me and then I found the photo above and then, of course, I went straight to mood board mode.  Voila, here are some beautiful, turquoise nursery ideas.


(Clockwise from top LEFT)
Elephant clock by LeLuni ($52)
Pick stitch crib bedding by Land of Nod ($49)
Squid night light by Happy Owl ($42)
Elephant pillow cover by Modernality ($19.95)
Kitui baskets set of 3 by Bambeco ($45)
Set of 8 4x6 carnival photos by bomobob ($35)


Tuesday, June 19, 2012

Rainbow Nursery Decor

Today's post is in celebration of gay pride week.  If you didn't know it was gay pride week, you probably don't live in NYC.  Now you know.  Enjoy the mood of the week and the mood of the board below - a rainbow themed baby's nursery.  I'm thinking white walls and white sheets to compliment the bright, bold, fabulous decor ideas below.


(Starting at top left, going counterclockwise)

Elephant wall print by Alpha Bino ($24.12)
Fabric wall art by The Old Pink Porch ($35)
Origami garland by All We Need is Origami ($19)
Rainbow stacker by Land of Nod ($49)
Ribbon pillow cover by The Red Pistachio ($27)
Braided rug by Green at Heart Rugs ($125)

Tuesday, May 8, 2012

Orange You Excited for a Gender Neutral Baby Shower?

Yes, this is a recycled title, I'm using "orange" as "aren't" again.  I posted about an orange nursery last November, entitled Orange You Excited to Decorate a Gender Neutral Nursery?  It featured the mood board below.


Go to the original post (here) for product details

Today I'm pulling together ideas for an orange themed baby shower.  Color themed parties are extra easy to pull together because necessities (decorations, invites, etc.) are readily available and they allow for creative party planning because the elements don't have to be matchy matchy.  After all, matchy matchy is a big NO, as Giuliana Rancic would say on E! Fashion Police.

I'm pleased to present some of the coolest Etsy born baby shower products that I've ever found.  I'm kicking it off, as always with invitations.


From top to bottom:
1. Chevron umbrella invitation by Executive Creations ($20 for set of 10)
2. Modern blue and orange invitation by Sophisticate Suite ($10 for digital file)
3. Elephant and peanut invitation invitation by Swanky Press ($30 for set of 20)


This banner by Parker Prints ($15.50) is unique and sweet.  It's perfect to hang over a refreshment table.  And, if you're not going to find out the gender then the banner can read "welcome baby".


Before coming across these raffle tickets by Middle Before ($6 for digital file) I had never heard of a diaper raffle.  I like it.  I'm into practical baby shower gifts (more on that here) and this is a fun way to encourage that.  


Orange (or tangerine or clementine) flavored macaroons would be baby shower perfection.  Here is a recipe for orange hazelnut macaroons from Cookstr.com.


This beautiful box is full of cupcake mix as a favor for shower guests.  It's made by Favor Box Bakery ($40 for 12 boxes) and I love it.  The colors are customizable.